


Related Stories
Optimal OBS Settings for Streaming
Wondering what settings you need to use for OBS to achieve both a clear, good-looking stream and minimal impact on your FPS? Below are the settings you need to adjust to strike a great balance.
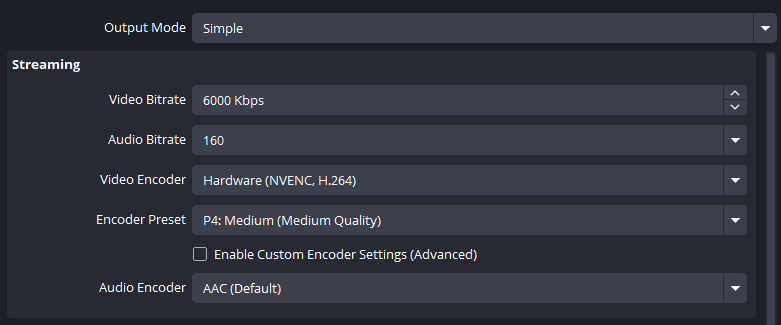
First, head to Settings and then to the Stream tab, where you can connect your chosen streaming account via the available options. Once you’ve done that, go to the Output tab. Here, ensure you have the following settings:
- Video Bitrate: Between 3500–6000 kbps is the perfect range. If your internet is slower, aim for the lower end of the range. For crisper quality, move toward the higher end.
- Audio Bitrate: 160 kbps is the default setting, and this works perfectly fine for what we need.
- Video Encoder: Choose Hardware (NVENC, H.264) for Nvidia GPUs or Hardware (AMD, H.264) for AMD GPUs. It’s important to use these hardware options for streaming—especially when playing a CPU-heavy game like Call of Duty—to avoid performance issues.
- Encoder Preset: P4: Medium Quality is a good starting point. However, for lower-end PCs, you might consider using P3 to save some FPS while maintaining decent stream quality.
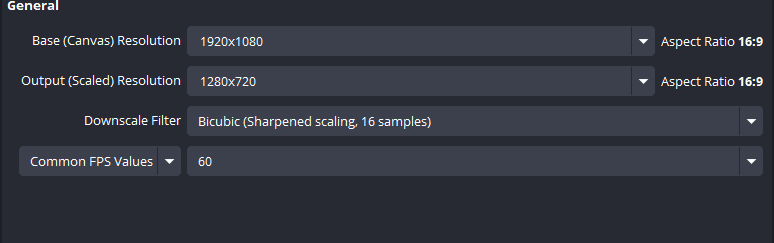
Next, we’ll head to the Video page, where the best options are as follows:
- Base Resolution: Set this to your monitor’s native resolution, which in most cases will be 1920x1080 (1080p).
- Output Resolution: Here, we have a choice. For the sharpest stream, match this to your base resolution. However, if you want to prioritize performance, you can downscale to 1280x720 (720p). This is easier on your PC, with only a minor loss in quality.
- Downscale Filter: Use Bicubic for this setting.
- Common FPS Values: Choose 60 for the smoothest stream. Alternatively, lowering it to 30 can improve your game’s performance with only a slight reduction in stream quality.
In the Audio tab, we’ll leave everything at its default settings. However, make sure in your Windows settings that your microphone and headset are set as both the Default Device and the Default Communications Device. This ensures you can hear all audio coming from your PC and that your microphone works properly.
The next important setting to adjust is in the Advanced tab. Here, navigate to the Stream Delay option, tick the "Enable" box, and set a delay of 20–60 seconds. This helps prevent people from stream-sniping while you’re playing games.

Once you’ve set everything up, all you need to do is click the Plus icon below Sources and add either a Game Capture for your specific game or a Window Capture for the entire monitor. After that, you’ll be ready to go live and stream your matches without any issues!